
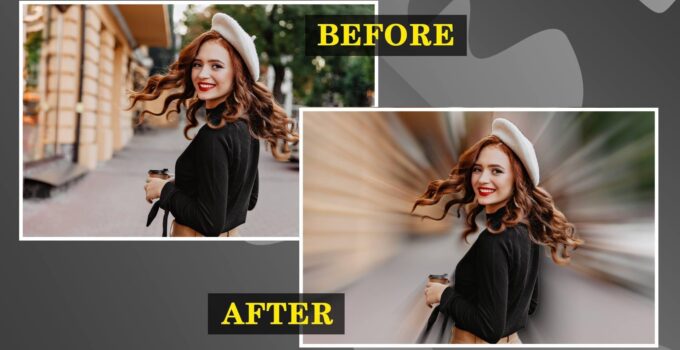
Wondering how to blur the background on iPhone after taking a photo? You have undoubtedly seen those stunning Instagram or Facebook photographs with brilliantly blurred backgrounds. Maybe you’ve attempted to create a similar appearance in your own photographs. Surprisingly, you don’t need a DSLR camera to make a blurred photo background. Regardless of the model, you can blur the background on iPhone after taking a photo with it using different apps.
In this article, we will elaborately discuss three methods for blurring the background on iPhone after taking a photo. So, get started.
Reasons for Blurring the Photo Background on iPhone
There are several reasons for blurring the photo background. It depends and varies from person to person. But according to our research, we have come up with several points:
- Remove distractions: When we take a photo, different types of unwanted objects come into the background. Blurring the background can help to remove any distracting elements from the photo, making it look cleaner and more focused.`
- Focus on the subject: In some cases, we have to focus on a certain portion. For that purpose blurring the background and other objects are necessary. Blurring the background helps to direct the viewer’s attention to the subject of the photo, making it stand out.
- Aesthetic effect: Photo quality and standard get enhanced when the focus of a picture is perfect. Blurring the background can create a pleasing and artistic effect, making the photo look more professional.
Source: photo.stackexchange.com
- Maintaining privacy: To maintain privacy, we need to blur some parts of a photo. If the objects in the background hamper our privacy, we should blur them. So, background blurring is essential for maintaining privacy.
How to Blur the Background on iPhone After Taking a Photo in 2 Ways
There are different ways to blur the photo background on an iPhone or iPad. Some of them are very complex. We individually tested all the methods. And come up with the two best ways. The first method involves using a third-party app called Blur Photo Editor. The second method includes the default Photo app of the iPhone. The methods are given as under:
- Blurring the background on iPhone after taking a photo using Blur Photo Editor
- Blurring the background on iPhone after taking a photo using iPhone’s default photos app
How to Blur the Background on iPhone After Taking a Photo Using Blur Photo Editor
One of the greatest photo blurring apps for the iPhone and iPad is Blur Photo Editor, which can precisely blur backgrounds, license plates, texts, and credit card information. Using this amazing app, you can blur the background on your iPhone after taking a photo. Moreover, This app also enables you to hide undesirable objects you don’t want other people to see and obtain pixelated or censored faces.
Shaan Ishfar Ann, one of the authors of Applavia, suggested on applavia blog using the Blur photo editor app for iPhone. Different parts of a photo include the background, face, unnecessary objects, etc. Moreover, he discusses different functions of that app to edit blurred images.
Follow the steps below to blur the background on your iPhone after taking a photo using Blur Photo Editor:
- Install the blur photo editor app on your iPhone.
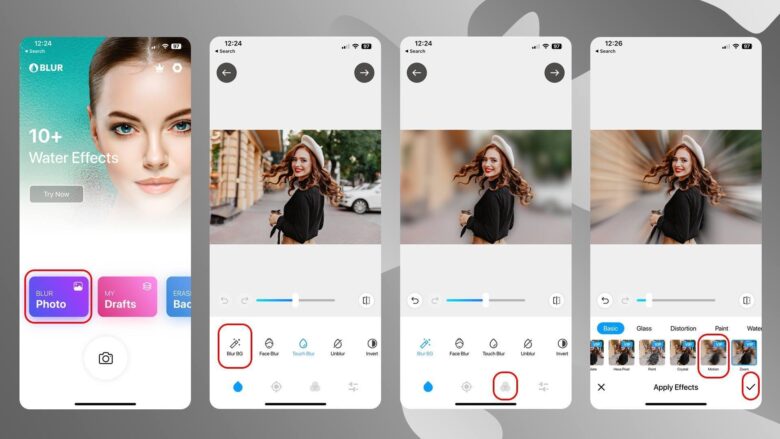
- Open the app and tap on the “Blur Photo” button on the first screen.
- Select the photo that you have taken.
- Here, you have two options; you can manually blur the background using the “Touch Blur” option. To automatically detect the background and blur the background, select the “Blur BG”. We would recommend you use the “Blur BG” option because it will save up your time and effort.
- You can change the intensity of the blur by moving the Thumb tooltip.
- You can add blur or pixelate filters to the background if you want. It will enhance the look of your photo.
- Finally, tap on the Tick Mark Arrow to finish the editing.
Understand Different Types of Blurs
There are different types of blur available depending on your needs:
- Gaussian Blur – This creates an overall soft look throughout your image by blending pixels together uniformly around edges and areas with fine details.
- Motion Blur – This simulates motion as though taken while moving or panning quickly with a camera, making it ideal for adding movement to otherwise static scenes and objects.
- Zoom Blur – This makes it appear as though you were zooming with your camera during the time exposure; making the image appear more dynamic and exciting than if you had snapped it without any blur effect at all.
How to Blur the Background on iPhone After Taking a Photo Using iPhone’s Default Photos App
The iPhone’s default photos app helps users organize and manage their photos. It also offers photo editing functionality. Considering a basic app, Photos is not a bad app for photo editing and blurring.
The editing feature of the Photos app includes a marker tool. Using the marker tool, you can blur the background on an image after capturing it with your iPhone. But the marker tool is a bit difficult to use as it neither uses automatic background detection nor magnifying screen for selecting a blurring path. Still, it will help you with blurring the background.
Follow the steps below to blur the background on iPhone after taking a photo using iPhone’s default photos app:
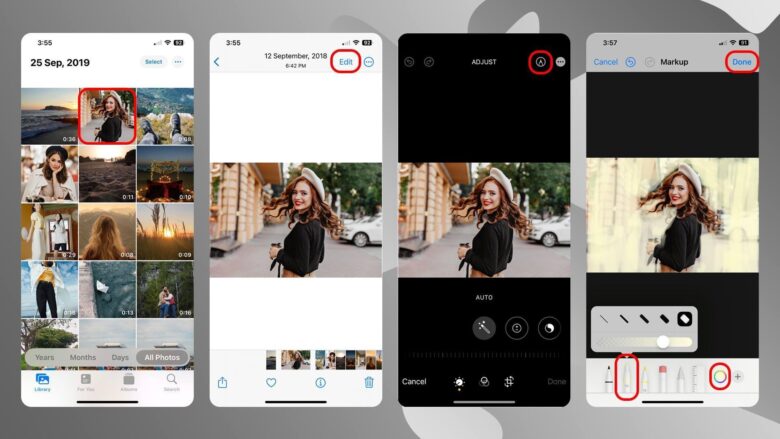
- Open the photos app and select the photo from the album.
- When selected. Tap on the “Edit” button at the top right corner.
- Then tap on the “Marker” icon at the top right corner.
- Then select the Brush-like pen, and select the color. Set the color opacity to 50%. Apply the pen in the background.
- After finishing the process, tap on the done button.
Conclusion
We have come up with solid methods for blurring the background of a photo. According to our observation, the first method(using the blur photo editor app) is better. It can blur the background with ease. Moreover, you will also get different photo editing functionalities.

