
This method is secure and safe, and you can easily root your Android device with the help of Magisk. Rooting the Android device is much easy in 2019 as there are many methods and apps available that root your Phone in a single click. Maybe you heard about magisk or not, but in this guide, we are going to root Android Phone with Magisk.
With the help of Magisk, you can easily root your devices. Magisk is a tool that eases and save your time, and steps are easy.
Requirements to Root Phone with Magisk
- If you want to use the Magisk, you have to install TWRP Recovery on your Phone. Don’t worry; we will guide you step by step how to do this. You may also need to install ADB and FastBoot Tools.
- You also have to unlock the bootloader on your Android Phone. For each Phone, it is different, so we cannot cover this topic.
Before move on, let’s take a quick look at:
Related Articles: Root Samsung Galaxy A90 Without PC
What are the Advantages of Using Magisk For Root Android Devices?
This question in the mind of every user that why should they choose magisk to root any Android Phone. So we have a few advantages here. Please take a quick look:
- Magisk will tell you quickly that your Phone is not rooted, and you have to root if you want. So Magisk is different than SuperSU.
- Magisk will not touch the system files and work with only root files.
- You can use Internet Banking Apps. For example, you can use Google Pay easily after root the Phone.
Step#1: Install ADB and FastBoot on Windows
First of all, you have to install the ADB and FastBoot on Windows. It is essential and accessible. We have already a complete guide step by step procedure to install ADB and Fastboot. We recommend to our readers that please check this below guide and install it properly. For any problem, let us know.
Related Articles: Install ADB and FastBoot on Windows
We hope that you have installed the ADB and FastBoot on Windows. Now follow few steps:
- Go to the folder where you download the ADB and FastBoot. You may seem this in C Folder. You can search for ADB there.
- Press the Shift Key + Right-click button on the blank white screen.
- It will show you the option of the command prompt.
- Open the command prompt.
Here you have to write a few commands.
Step#2: Download Latest TWRP Img File
GO to the google and search TeamWin TWRP. Open the website and go to the Devices option. Search for your device and download the file of your device.
I hope you will download the .img file from there. If you don’t see your device, then wait for a few days. Or write to us in a comment, we will help you.
Save the TWRP img file in the C:/adb. Your file should be in the ADB folder.
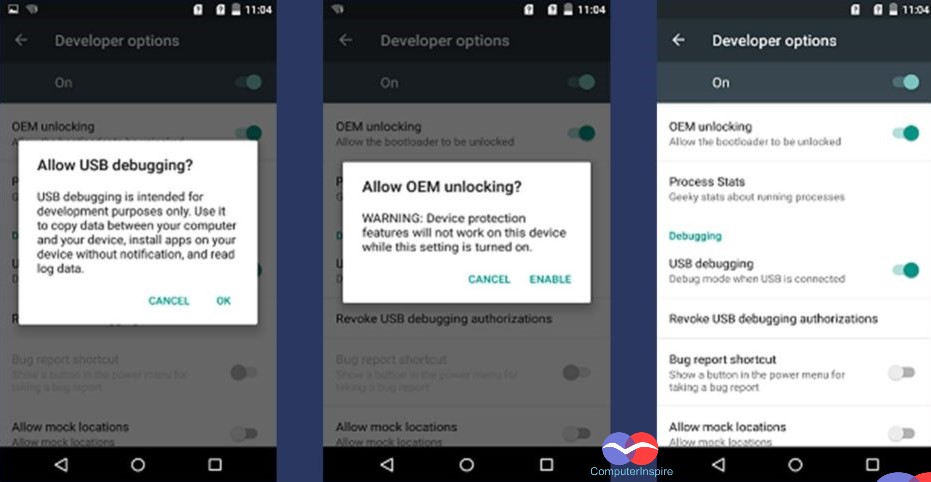
Step#3: Enable USB Debugging
On this step, you can go to Settings > About Phone> Build Number > Tap 7-8 Times on Build Number Options. It will enable the Developer Option.
Go to Phone Settings Again > Go to the Developer Options > Enable the USB Debugging Option.
If you have any problem, then take a look at the below guide.
Related Article: How to Enable Developer Options, USB Debugging and OEM Unlocking
Connect your Phone with the PC. Click on Allow option from Phone.
Step#4: Type Commands on the Command Prompt
Here in this step, you have to write a few commands to install TWRP Recovery first. In the ADB folder where you have installed ADB in C:/adb. Hold shift button and right-click, then it will show the open PowerShell window. Click on the PowerShell window. It will open the command prompt where you have to write a few commands.
Type first command and press enter
Second Command and press enter
Make sure your file name is twrp.img, or you will write here whatever your file name is.
Third command and press enter
Congratulations, your device will reboot, and it will Install TWRP Recovery on your Android Phone.
The next step is to Install Magisk
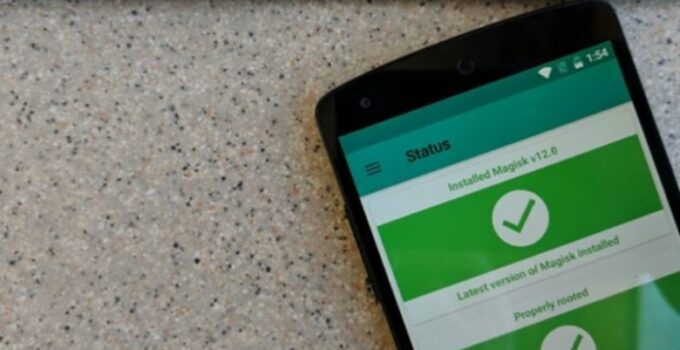
Step#5: Install Magisk
Now come to your laptop. Download the Latest Magisk. You can go to the official website to download Magisk. You can download the Magisk from here also. Or you can download from the XDA Developers.
Latest Github also released. If you want to download from there you can download from ghithub.
OK. Now we hope that you have to download the Magisk. Don’t unzip the file. And also, copy the file into the ADB and FastBoot Folder.
Step#6: Go back to the Command Prompt
Go back to the command prompt and write the below command.

This command will push the Magisk Zip file to the Android device.
From the Android Phone. Find the Magisk Zip file that you pushed from PC to Android Phone using the above command.
Once you find the .zip File, flash this file using TWRP.
Step#7: Reboot
Reboot your Android device. You can boot Phone into Android, usually this time.
Conclusion:
I hope you understand well how to Root Android Phone with Magisk. If you have any questions. Computerinspire will guide you. Thanks


